When you are looking for open reading frames in newly sequenced regions, it’s not always the longest ORFs that are protein-encoding. Lets look at an example from one of the sequences included with MacVector: /Applications/MacVector/Sample Files/Gal Cosmid.nucl. This is from Streptomyces coelicolor, a filamentous bacteria with a 73% G+C content. The high G+C% means that…
MacVector 15 has many new features including new protein analysis tools for reference alignment of proteins, translated DNA alignments and for functional analysis of protein sequences. InterProScan: Scan proteins for functional domains against a variety of sequence, protein family, domain and motifs databases using the InterProScan service. This performs a search against many different databases…
You can use the Database | Align To Folder function as your own “personal BLAST search”, comparing a sequence to all of the sequences in a target folder hierarchy. The files in the folder can be in any format MacVector recognizes, including fasta and fastq formatted multiple sequence files. Many users take this approach to…
When you copy a section from a long sequence and paste it into a new MacVector window, the original numbering from the original sequence is retained. This is very useful if you want to work on a shorter segment of a genome without losing the original numbering. However, sometimes it is preferable to have the…
OS X’s Finder has many features for quickly finding and working with your files. Spotlight Search is one such tool that most Mac users are familiar with. However, Smart Folders is a tool that is very useful but often overlooked. Smart Folders allow you to create a dynamic folder whose contents are derived from a…
MacVector tries to optimize the Map graphics layout using a trade-off between performance and minimizing unnecessary white space. Sometimes the default settings we have chosen are not ideal, particularly if you are looking at the Map tab of an Align To Reference window where you have a large number of reads overlapping the same region.…
We often get asked “how do I do an alignment” using MacVector? Well, the answer to that is always “it depends”, and it depends on what you want to learn about your sequence(s). Here’s a quick summary of the different types of alignments and what you would use them for: You can learn more about…
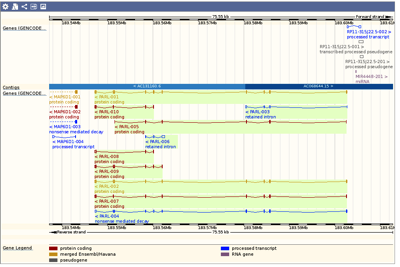
Many Genome Browsers/databases allow you to browse and view genomes, or a specific gene/region, with a high degree of detail. For example ENSEMBL and the UCSC Genome Browser. However, many times you want to work with that data on your own Mac. As usual the easiest way to exchange sequence data is using the Genbank…
Being able to Drag Zoom makes it easy to view a specific region of your sequence in greater detail. To Drag Zoom, just hold down the mouse button and drag the cursor along your sequence. The Map view will redraw to show the selected area in greater detail. Once you are zoomed in you have…
QuickTest Primer is a great tool for primer design. Paired with Primer Design/Test (Pairs) it gives you great control and flexibility for designing primers with tails, mismatches, silent mutations, one out sites and more. Once you’ve designed your primer the next step is to get it synthesized. QuickTest Primer will produce a PDF report of…