Over the past few releases of MacVector, we have been adding a lot of functionality to the Quicktest Primer and Primer Design (Primer3) interfaces and slowly removing the old outdated primer design functions. The general strategy is that anything you need to do with a single primer, you can accomplish using the Quicktest Primer interface. Any manipulations to handle pairs of primers should be run through the Primer Design (Primer3) interface.
MacVector 13.5 made some changes to the Primer Design (Primer3) interface to allow it to completely substitute for the old Test PCR Primer Pairs algorithm that has now been removed from the Primers sub-menu. If you want to test an existing pair of primers for suitability, use the following steps:
1) Open the target sequence and choose Analyze | Primers | Primer Design (Primer3). If you plan on copying sequence information from your target sequence, then first click on the Replica toolbar button to open a second “replica” window as this will let you copy data from the sequence to paste into the Primer Design drop-down sheet.
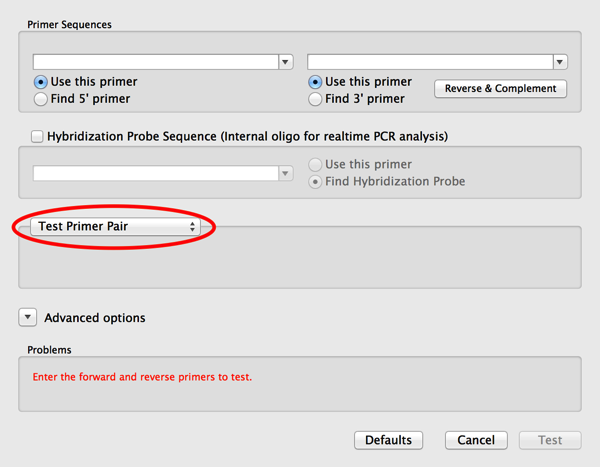
2) Click on the Use This Primer checkbox for both the left and the right primer. When you do that you will find that the Mode popup menu changes to Test Primer Pair – this is a mode that completely bypasses Primer3 and lets you test pairs of primers using an updated variant of the old Test PCR Primer Pairs algorithm;

3) Now paste or type the primer sequences you want to test into the two edit boxes. Note that there is a convenient Reverse and Complement button that lets you “flip” the right hand primer if you have copied it from the plus strand of the target sequence.
4) If you get warnings that the primer(s) are of an invalid size or %G+C, then click on the Advanced options button and modify the settings in the Characteristics tab.
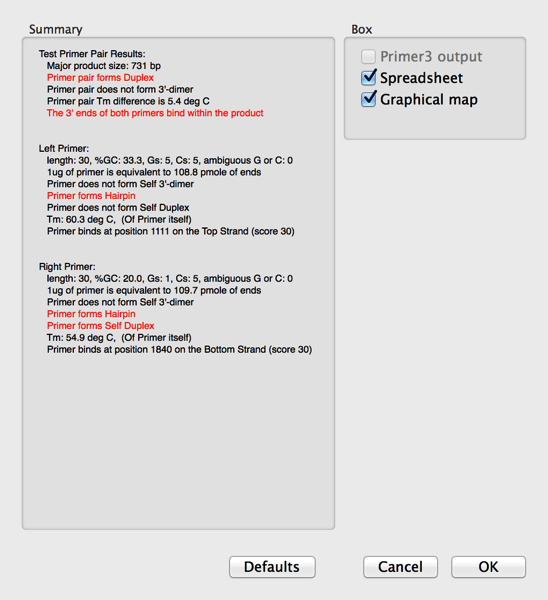
5) Finally click on the OK button to run the test. A result window will appear;

Note how any problems are shown in red text. This does not mean that the primers will not actually work in a PCR reaction, just that you may need to play with the conditions a little to get optimal results.
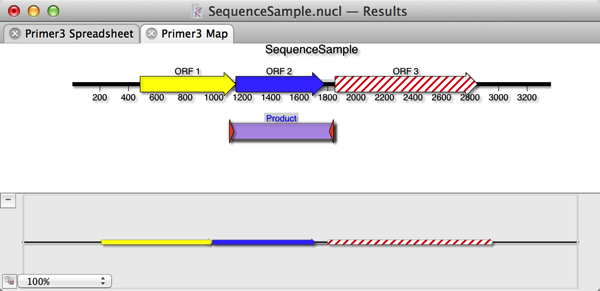
6) Select the Spreadsheet and Graphical Map checkboxes and click OK. The Map will show the single product produced by the primers (assuming they both bind to the target sequence pointing at each other such that they would create a product). If you select the Product and choose Edit | Copy, this will copy the predicted product, including any mismatches included in the primer. i.e. if you have purposefully introduced a mutation into the primer, this will be present in the copied product sequence.

7) The Spreadsheet result tab displays the Tm of the primers and product, as well as their length and G+C%. MacVector 13.5 also adds the optimal estimated annealing temperature for the reaction. You may need to widen the window a little to see this column. The calculation used is identical to that used by the old Test PCR Primer Pair algorithm and takes into account not just the two primers, but also the annealing of the predicted product to the template;

This is an article in a long running series of tips to help you get the most out of MacVector. If you want to get notified every time a new tip gets published, follow us @MacVector on twitter (or check the feed for the hashtag #101MacVectorTips) or like us on Facebook.
2 Comments
This is so nearly working perfectly… but not quite. The tool has an absolute limit on primer length of 35nt that cannot be increased in the Advanced settings tab. But tagged primers, which Quicktest Primer deals with very nicely, can be MUCH longer than that! In a recent (successful) Q5 mutagenesis experiment I used a pair of primers of 85nt and 95nt, with around 19nt of perfect match at the 3′ end. I would like to have been able to “Test” this pair, especially as a quick way of doing the virtual cloning via the Graphical Map that you describe above.
Ideally I’d like to see Quicktest Primer updated to allow simultaneous design of both forward and reverse tagged primers, with a direct link to “Test” the designed pair, as this tool displays the found hairpins and duplexes.
As it happens, I stumbled across the exact same bug while writing the article. Primer3 has a hard-coded limit of 35nt and we neglected to remove that for the “Test Primer” functionality. We will remove that in the 13.5.1 release, due in the next week or so.