There are a number of different ways that you can find the potential binding locations of primers on a sequence using MacVector. You can use the Quicktest Primer function, or create a Primer database and scan for potential primer binding sites using the Analyze | Nucleic Acid Subsequence analysis algorithm. You can also use the Edit | Find function to search for the primer sequence, though that does currently require a perfect match between the primer and the target sequence.
All of these approaches are great, but they do have the one limitation that they will not report potential binding sites if there are any insertions or deletions in the primer or target binding site sequences. To find potential binding sites where the primer has an insertion or deletion relative to the target sequence, you need to use the Analyze | Align To Reference function. However, you do need to adjust some of the alignment parameters to get this to work correctly. Here’s how to do that;
First, you need to get your primer sequences in a suitable file format that the Align To Reference function can read – this means any standard sequence format that MacVector can read. You can either save each primer as a single file with the name of the file being the name of the primer, or you can create a single “multiple sequence” file with all of the primers contained in that file. If you use the second approach, by far the easiest format to use is the FastA multiple sequence format. This is a simple text format where the primers appear in the format;
>name_without_spaces optional comment that can have spaces
AGCTGTAGCTGTGTTGATTCTT
So a more complete example might look like this;
>Primer1
TTTTGCTAAAGACGTAAAACAAG
> Primer1delta deletion at 9
TTTTGCTAAGACGTAAAACAAG
> Primer1insert insertion at 9
TTTTGCTAGAAGACGTAAAACAAG
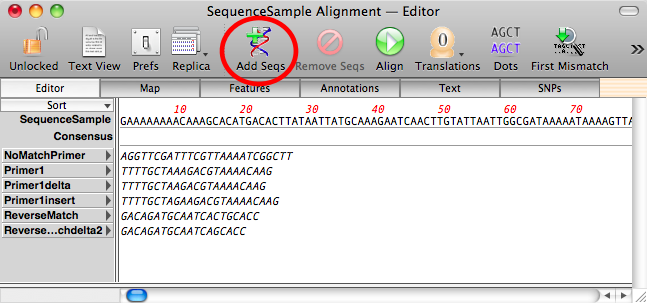
Once you have your primers in a suitable format, open the sequence of interest and choose Analyze | Align To Reference. In the window that opens, click on the Add Seqs toolbar button and then select the file(s) containing your primer sequences.

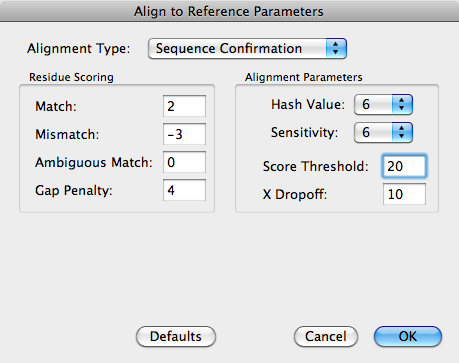
After import, the individual primer sequences are shown in italics to indicate they have not been aligned. Click on the Align toolbar button to run the alignment algorithm. However, to ensure these short primers will align correctly, we need to adjust the alignment parameters because the defaults are tuned for long sequence confirmation experiments;

In particular, note that the Score Threshold needs to be reduced – a value of 20 means that with a match value of 2, there needs to be an unbroken run of at least 10 residues to match or exceed the value, or 13 residues containing a single mismatch (work it out!). To better handle short runs of gaps, increasing sensitivity to 6 or more will produce better alignments at the cost of slower alignments.
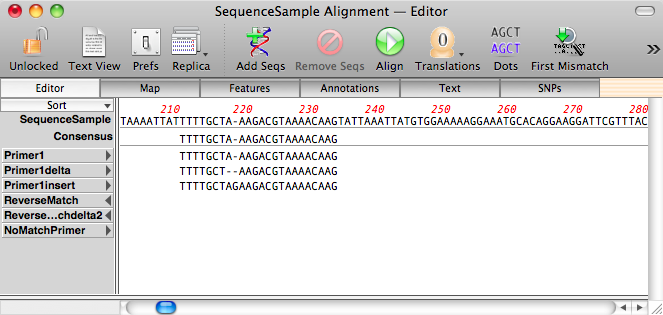
After the alignments are complete, you can see the gapped primers aligned in the Editor tab;

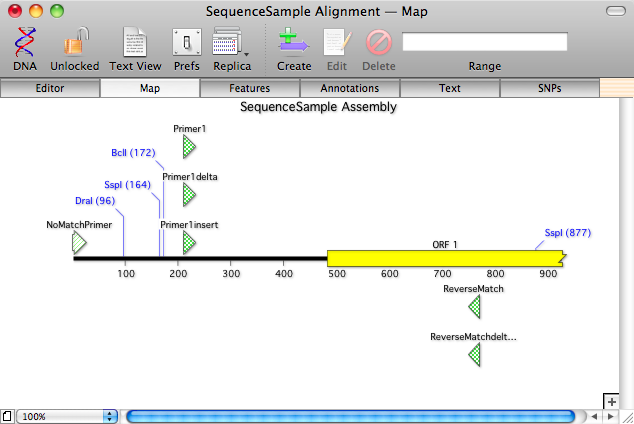
For an overview of the alignment, checkout the Map tab;

Note how unaligned primers pile up at the beginning of the sequence and are shown in a paler color than the aligned primers.
This is an article in a long running series of tips to help you get the most out of MacVector. If you want to get notified every time a new tip gets published, follow us @MacVector on twitter (or check the feed for the hashtag #101MacVectorTips) or like us on Facebook.